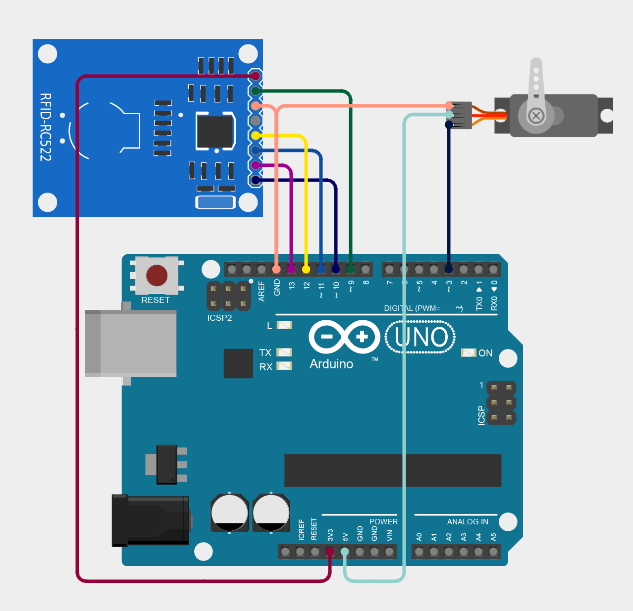
The RFID Automatic Car Gate Controller is an intelligent vehicle access control system that uses RFID technology to identify authorized vehicles and automatically open a gate. Each authorized vehicle is assigned a unique RFID card or key tag. When the RFID tag is brought near the RFID reader, the Arduino reads the card's unique ID (UID). If the UID matches a stored authorized ID, the system opens the gate using a servo motor, allowing the vehicle to pass. After a preset delay, the gate automatically closes. Unauthorized cards are denied access, improving security and reducing the need for manual gate operation.
| Component | Quantity |
|---|---|
| Arduino Uno | 1 |
| MFRC522 RFID Reader | 1 |
| RFID Cards/Tags | 2 or more |
| Servo Motor (SG90/MG996R) | 1 |
/*
 * This Arduino Sketch interfaces with an RC522 RFID module and a servo motor.
 * When an RFID card is scanned, the servo rotates to 90 degrees. After a 5
 * second delay, the servo returns to its initial position of 0 degrees.
 */

#include <SPI.h>
#include <MFRC522.h>
#include <Servo.h>

#define SS_PIN 10
#define RST_PIN 9
#define SERVO_PIN 3

MFRC522 rfid(SS_PIN, RST_PIN);
Servo myServo;

void setup() {
  Serial.begin(9600);
  SPI.begin();
  rfid.PCD_Init();
  myServo.attach(SERVO_PIN);
  myServo.write(90); // Initialize servo to 0 degrees
}

void loop() {
  if (!rfid.PICC_IsNewCardPresent() || !rfid.PICC_ReadCardSerial()) {
    return;
  }

  Serial.println("Card detected!");
  myServo.write(0); // Rotate servo to 90 degrees
  delay(5000);       // Wait for 5 seconds
  myServo.write(90);  // Return servo to 0 degrees

  rfid.PICC_HaltA(); // Halt PICC
  rfid.PCD_StopCrypto1(); // Stop encryption on PCD
}
Get an official Project Completion Certificate with a unique ID & QR verification — perfect for internships, resumes, and college submissions.
Get Certificate →