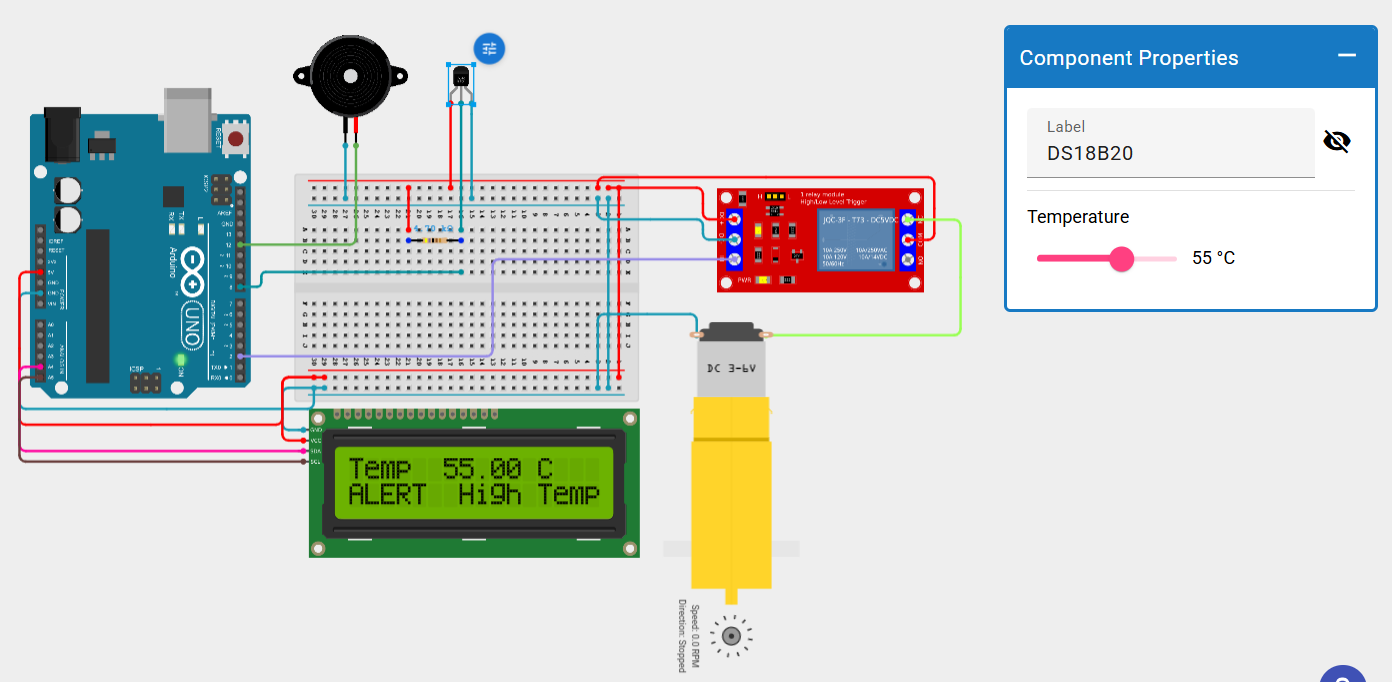
The Automatic Temperature-Based DC Motor Controller is an embedded system that continuously monitors temperature using an DS1820 temperature sensor. The measured temperature is displayed on a 16×2 LCD. When the temperature exceeds 40°C, the Arduino automatically activates a relay to switch ON a DC motor (or cooling fan). At the same time, the LCD displays an "ALERT: HIGH TEMP" message. Once the temperature falls below the threshold, the relay switches OFF and the LCD returns to normal status.
This project is suitable for automatic cooling systems in industries, server rooms, laboratories, greenhouses, and home automation.
| Component | Quantity |
|---|---|
| Arduino Uno | 1 |
| DS1820 Temperature Sensor | 1 |
| 16×2 LCD with I2C Module | 1 |
| Single Channel Relay Module | 1 |
| 12V DC Motor/Fan | 1 |
| 12V Power Supply | 1 |
| Jumper Wires | As required |
| Breadboard | 1 |
/*
 * Arduino Sketch for controlling a relay and a piezo speaker based on
 * temperature readings from a DS18B20 sensor. The circuit includes a
 * 16x2 I2C LCD for displaying temperature and an alert message when
 * the temperature exceeds 40°C. The relay is activated and the buzzer
 * rings when the temperature is above 40°C.
 */

#include <Wire.h>
#include <LiquidCrystal_I2C_Hangul.h>
#include <OneWire.h>
#include <DallasTemperature.h>

#define ONE_WIRE_BUS 8     // Pin connected to the DS18B20 data pin
#define BUZZER_PIN 12      // Pin connected to the piezo speaker
#define RELAY_PIN 2        // Pin connected to the relay

LiquidCrystal_I2C_Hangul lcd(0x27, 16, 2); // LCD address 0x27 for 16x2
OneWire oneWire(ONE_WIRE_BUS);
DallasTemperature sensors(&oneWire);

void setup() {
  lcd.init();
  lcd.backlight();
  sensors.begin();
  pinMode(BUZZER_PIN, OUTPUT);
  pinMode(RELAY_PIN, OUTPUT);
  digitalWrite(BUZZER_PIN, LOW);
  digitalWrite(RELAY_PIN, LOW);
}

void loop() {
  sensors.requestTemperatures();
  float temperature = sensors.getTempCByIndex(0);

  lcd.clear();
  lcd.setCursor(0, 0);
  lcd.print("Temp: ");
  lcd.print(temperature);
  lcd.print(" C");

  if (temperature > 40) {
    digitalWrite(BUZZER_PIN, HIGH);
    digitalWrite(RELAY_PIN, HIGH);
    lcd.setCursor(0, 1);
    lcd.print("ALERT: High Temp");
  } else {
    digitalWrite(BUZZER_PIN, LOW);
    digitalWrite(RELAY_PIN, LOW);
  }

  delay(2000); // Wait 2 seconds before next reading
}
Get an official Project Completion Certificate with a unique ID & QR verification — perfect for internships, resumes, and college submissions.
Get Certificate →