The Internet of Things (IoT) has transformed traditional monitoring systems into smart, cloud-connected applications. Using an ESP32 development board and a DHT22 temperature and humidity sensor, it is possible to collect environmental data and upload it to the Blynk Cloud in real time. Once the data reaches the cloud, it can be viewed on a mobile phone or web dashboard from anywhere with an internet connection. Blynk automatically stores historical data, allowing users to analyze temperature and humidity trends over time. The platform supports dashboards, notifications, automation, and cloud data logging, making it an excellent solution for IoT monitoring applications
Components Required
Component Quantity
ESP32 Development Board 1
DHT22 Temperature & Humidity Sensor 1
Breadboard 1
Jumper Wires As Required
USB Cable 1
WiFi Connection 1
Software Required
Arduino IDE
ESP32 Board Package
Blynk IoT Account
Blynk Mobile App
Blynk Library
DHT Sensor Library by Adafruit
Working Principle
ESP32 connects to the WiFi network.
ESP32 authenticates with the Blynk Cloud using the Authentication Token.
DHT22 measures temperature and humidity every two seconds.
ESP32 sends sensor readings to the Blynk Cloud.
Blynk stores the data in cloud storage.
Users can monitor live values and historical graphs through the Blynk mobile application or web dashboard.
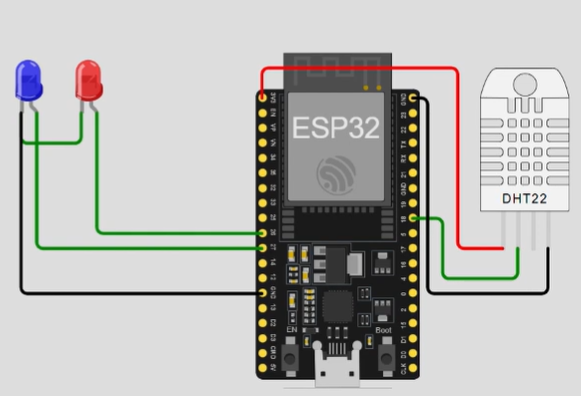
Circuit Diagram
Connections
DHT22 Pin ESP32 Pin
VCC 3.3V
DATA GPIO4
NC Not Connected
GND GND
Note: Use a 10kΩ pull-up resistor between VCC and DATA if your DHT22 module does not already include one.
Circuit Representation
DHT22
+-----------+
| |
VCC|-----------3.3V
DAT|-----------GPIO4
GND|-----------GND
+-----------+
ESP32
Installing Required Libraries
Install the following libraries from Arduino IDE → Library Manager
Blynk
DHT Sensor Library
Adafruit Unified Sensor
Creating the Blynk Dashboard
#define BLYNK_TEMPLATE_ID "YourTemplateID"
#define BLYNK_TEMPLATE_NAME "DHT22 Monitor"
#define BLYNK_AUTH_TOKEN "YourAuthToken"

#include <WiFi.h>
#include <BlynkSimpleEsp32.h>
#include <DHT.h>

char ssid[] = "YOUR_WIFI_NAME";
char pass[] = "YOUR_WIFI_PASSWORD";

#define DHTPIN 4
#define DHTTYPE DHT22

DHT dht(DHTPIN, DHTTYPE);

BlynkTimer timer;

void sendSensor()
{
  float h = dht.readHumidity();
  float t = dht.readTemperature();

  if (isnan(h) || isnan(t))
  {
    Serial.println("Failed to read DHT22");
    return;
  }

  Serial.print("Temperature: ");
  Serial.println(t);

  Serial.print("Humidity: ");
  Serial.println(h);

  Blynk.virtualWrite(V0, t);
  Blynk.virtualWrite(V1, h);
}

void setup()
{
  Serial.begin(115200);

  dht.begin();

  Blynk.begin(BLYNK_AUTH_TOKEN, ssid, pass);

  timer.setInterval(2000L, sendSensor);
}

void loop()
{
  Blynk.run();
  timer.run();
}
Get an official Project Completion Certificate with a unique ID & QR verification — perfect for internships, resumes, and college submissions.
Get Certificate →