The webpage displays live temperature, humidity, soil moisture percentage, pump status, and allows manual control of the irrigation pump. Additionally, the system supports automatic irrigation by turning the water pump ON or OFF according to predefined soil moisture thresholds.
This project is ideal for home gardens, greenhouses, agricultural research, and smart irrigation systems.
Project Features
Real-time Temperature Monitoring
Real-time Humidity Monitoring
Soil Moisture Monitoring
Automatic Water Pump Control
Manual Pump ON/OFF Control
ESP32 Web Server
Mobile-Friendly Web Dashboard
Live Sensor Updates
Pump Status Display
Local Network Monitoring via IP Address
Low Power Consumption
Working Principle
ESP32 connects to the Wi-Fi network.
ESP32 creates an embedded web server.
The web server is accessible through the ESP32 IP address.
DHT22 continuously measures temperature and humidity.
Soil moisture sensor measures the moisture level in the soil.
If soil moisture falls below the predefined threshold, the ESP32 automatically turns ON the relay to activate the water pump.
Once sufficient moisture is detected, the relay switches OFF the pump.
The webpage displays:
Temperature
Humidity
Soil Moisture
Pump Status (ON/OFF)
Auto/Manual Mode
Users can manually switch the pump ON or OFF using buttons on the webpage.
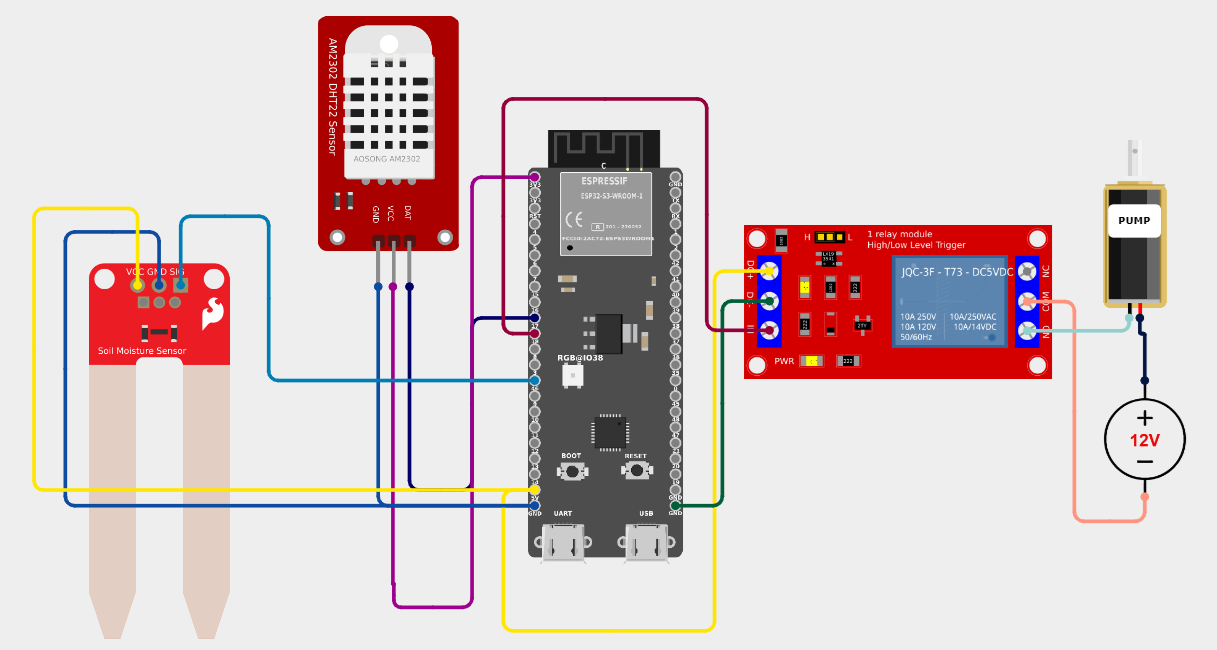
Connections
DHT22 DATA → GPIO 4
Soil Moisture AO → GPIO 34
Relay IN → GPIO 26
Relay VCC → 5V
Relay GND → GND
#include <WiFi.h>
#include <WebServer.h>
#include <DHT.h>
#define DHTPIN 4
#define DHTTYPE DHT22
#define SOIL_PIN 34
#define RELAY_PIN 26
DHT dht(DHTPIN, DHTTYPE);
WebServer server(80);
// WiFi Credentials
const char* ssid = "YOUR_WIFI_NAME";
const char* password = "YOUR_WIFI_PASSWORD";
bool pumpStatus = false;
// Soil Moisture Threshold (%)
int threshold = 40;
void setup() {
Serial.begin(115200);
dht.begin();
pinMode(RELAY_PIN, OUTPUT);
digitalWrite(RELAY_PIN, LOW);
WiFi.begin(ssid, password);
Serial.print("Connecting");
while (WiFi.status() != WL_CONNECTED) {
delay(500);
Serial.print(".");
}
Serial.println();
Serial.println("WiFi Connected");
Serial.print("IP Address : ");
Serial.println(WiFi.localIP());
server.on("/", handleRoot);
server.on("/pumpon", pumpON);
server.on("/pumpoff", pumpOFF);
server.begin();
}
void loop() {
float temp = dht.readTemperature();
float hum = dht.readHumidity();
int raw = analogRead(SOIL_PIN);
// Convert to Percentage
int moisture = map(raw, 4095, 1500, 0, 100);
moisture = constrain(moisture, 0, 100);
// Automatic Pump Control
if (moisture < threshold) {
digitalWrite(RELAY_PIN, HIGH);
pumpStatus = true;
}
else {
digitalWrite(RELAY_PIN, LOW);
pumpStatus = false;
}
server.handleClient();
}
void pumpON() {
digitalWrite(RELAY_PIN, HIGH);
pumpStatus = true;
server.sendHeader("Location","/");
server.send(303);
}
void pumpOFF() {
digitalWrite(RELAY_PIN, LOW);
pumpStatus = false;
server.sendHeader("Location","/");
server.send(303);
}
void handleRoot() {
float temp = dht.readTemperature();
float hum = dht.readHumidity();
int raw = analogRead(SOIL_PIN);
int moisture = map(raw,4095,1500,0,100);
moisture = constrain(moisture,0,100);
String page="<!DOCTYPE html><html>";
page+="<head>";
page+="<meta http-equiv='refresh' content='3'>";
page+="<title>Smart Farming</title>";
page+="</head>";
page+="<body style='font-family:Arial;text-align:center;background:#e8f5e9;'>";
page+="<h1>🌱 IoT Smart Farming</h1>";
page+="<h2>ESP32 Web Server</h2><hr>";
page+="<h3>Temperature : ";
page+=String(temp);
page+=" °C</h3>";
page+="<h3>Humidity : ";
page+=String(hum);
page+=" %</h3>";
page+="<h3>Soil Moisture : ";
page+=String(moisture);
page+=" %</h3>";
page+="<h3>Pump Status : ";
if(pumpStatus)
page+="<font color='green'>ON</font>";
else
page+="<font color='red'>OFF</font>";
page+="</h3><br>";
page+="<a href='/pumpon'><button style='width:120px;height:45px;font-size:18px;'>Pump ON</button></a>";
page+=" ";
page+="<a href='/pumpoff'><button style='width:120px;height:45px;font-size:18px;'>Pump OFF</button></a>";
page+="<br><br>";
page+="<h4>Auto Pump Threshold : ";
page+=String(threshold);
page+=" %</h4>";
page+="<p>Refreshes every 3 seconds</p>";
page+="</body></html>";
server.send(200,"text/html",page);
}
Get an official Project Completion Certificate with a unique ID & QR verification — perfect for internships, resumes, and college submissions.
Get Certificate →